
PMA Magazine has always strived to bring you content you can’t read elsewhere. There’s a reason for that: there are already many audio review magazines out there, some very good, and we didn’t want to be samey. We wanted to be different. We wanted to talk about audio—to present it—in original ways and from different perspectives. And we wanted to create content that would be enduringly relevant, not just flavour of the month.
This new column, “Make your system sound better NOW”, is no different. It will be helmed by Paul Bowes, a scientist and one of the most passionate audiophiles I’ve met, and whose system was featured in “No, I have the best system in the world!” #7. From an innate desire to share his knowledge with others—he mentors students at the University of British Columbia—Paul will, starting now, bring you regular helpings of tested ideas, acquired over decades of pursuing better sound reproduction, to help you make your system sound its best. So, if sound quality is important to you, read on, and be prepared, over the span of this series, to discover just how good your system can sound.
—Robert Schryer, Editor
Intro
Listening to music is one of the most important things in my life. I’ve embarked on a lifelong quest to find ways to better immerse myself in the music and, as faithfully as possible, capture the stories musicians tell their audience through their art.
Reaching a higher level of performance and musical engagement from my system has been a steep learning curve and taken me to places I never thought possible. My personal journey to optimize my hi-fi equipment has been a phenomenal experience, one that I use to help others get the most out of their own gear.
So, how do you get the most musicality from your current stereo system and where do you start? This is my journey and your mileage may vary, but I do believe it may be an eye opener for you.
Many years ago, I was quite naïve about knowing how to get the best from my system, and relied completely on my stereo sales guys and their advice. However, after spending a lot of money on equipment and speaker upgrades, I still wasn’t completely satisfied with my sound. That’s when it occurred to me that surely there must be ways to get better performance from the equipment I already owned, rather than continually spending more money on new gear that failed to live up to my expectations. I wanted to get off the audio gear merry-go-round, and only upgrade because I wanted to, not because I had an incurable case of upgraditus.
In my many years of trials and errors with component upgrades and tweaks, I discovered many great improvements. My experience and knowledge have allowed me, and continue to allow me, to improve the sound of systems in other homes. So far, I’ve helped optimize stereos in 12 different countries in Europe and North America, where I visited over 110 different homes.
To achieve higher levels of playback performance and, ultimately, get me closer to the music, I took a multi-level approach. Some of the tweaks are free, some inexpensive and some moderately priced, but collectively, the techniques I’ll show you have significantly elevated the sound quality and musicality of my system, and others I’ve applied them to.
During my house calls at people’s homes, I bring along a tool kit of items to facilitate the sound-optimization process. This kit includes a laser distance measurer, a digital torque wrench (0.2-5 Nm range), a carpenter’s level, a tape measure, copper tape and other EMI shielding materials, IKEA Gunstigs, IsoAcoustics ISO-PUCK minis, an AC noise sniffer, EMI Trifield meter, a set of electronics drivers and bits for the torque wrench, as well as a set of mini electronics screwdrivers. A USB stick with some of my 24 bit reference music is also helpful, as well as a sound pressure meter. I also bring along audiophile grade Ethernet cables and audiophile digital switches, and some higher end power cords for demo purposes only. I don’t have anything to sell, I just want to demo what the audio equipment can do.
I always ask the owner to play some of their favourite reference music to hear what their system sounds like and get an idea of what potential steps to take next. I also ask what they like and dislike about their system and what they think would make their system sound better.
Speaker Setup and Positioning
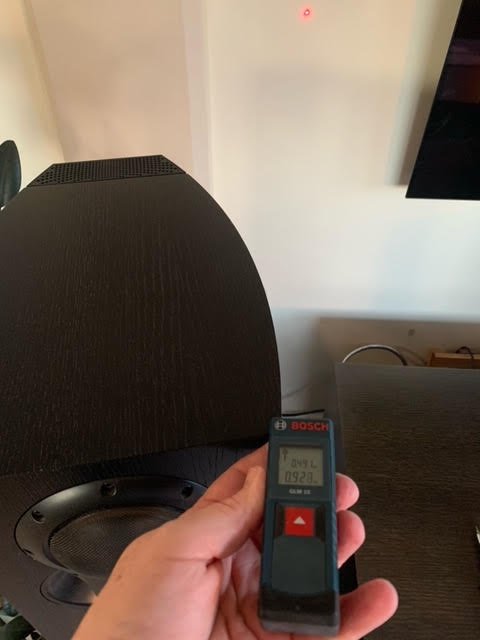
Speaker positioning may sound like an obvious step, but it’s one that’s often neglected. Done correctly, it can not only dramatically transform the sound in your listening room, but make the music sound very good in adjacent rooms in the house.
The process involves moving around the speakers into their ideal position, or at least into the best position your room dimensions or significant other will allow. This process includes careful listening to reference tunes you’re extremely familiar with. I usually limit the number of tunes to 3 or 4 so I don’t get overwhelmed trying to process possible differences between tracks every time I make a change to a speaker’s set up. It’s usually helpful to invite a friend or two over, whose hearing you trust, to provide critical feedback.
For listening, I use (Scottish audio company) Linn’ s Tune Dem method, humming along to the music in my head. I follow the tune, the pace, the rhythm and timing, as well as the musical presentation. This involves playing 20-30 second snippets of the music, over and over, as you make adjustments to the positioning of the speakers. I don’t just listen to the music, I observe how it feels to me physically, to my body. When the music sounds and feels right, it is right.
Using a laser measure, I measure distance from front and side walls, as well as toe-in and distance to the listening position. I make sure the front left and right speakers are exactly the same distance from the front wall (behind the speakers), and, if the room allows it, the same distance from the side walls and toe-in angle.
I set toe-in to give a good centre image, as well as a large soundstage that has depth, width, and height. That said, some speakers may not require toe-in.
It’s important that speakers be levelled so that they’re exactly vertical and on solid footing with no wobble on the spikes. Intuitively, it might not seem to make sense that levelling the speakers vertically can make much of a difference to sound quality, since the speakers disperse the sound in a similar fashion whether they are fully level or with a slight tilt. However, levelling the speakers definitely made a difference in my room and those of others I’ve visited—the music sounded slightly more solid and coherent.
After I place the speakers on solid footing, I use a carpenter’s level on top of the speaker cabinets to ensure the bubble in the level is centred from all angles. If not, I’ll adjust the spikes or footers accordingly.
If you’re using spikes on the bottom of the speakers in a carpeted room, it’s critical that the bottom of the speaker’s cabinet is not still resting on the carpet, as that can result in a presentation that will sound muddied or lifeless. You may wish to experiment by using a piece of marble on top of the carpet, under each speaker to rest the spikes on, or a thick bamboo or maple cutting board that is larger than the footprint of the speakers.
I personally don’t use spikes for my speakers. With my Linn Akubariks speakers, I replaced the spikes with IsoAcoustic Gaias, and the improvements in sound quality were astonishing. What surprised me most was that as the Gaias settled in with the weight of the Akubariks on them, the sound quality continued to improve over the next 12 hours. In fact, my Akubariks had taken on a whole new persona, adopting a sound signature I hadn’t experienced before.
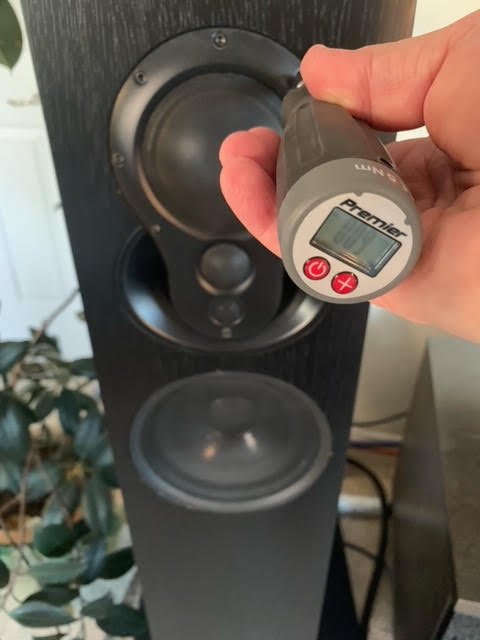
Something else that can have a profound effect on sound quality is the torque values of bolts holding the speaker drivers to the cabinets. I have found that the bolts loosen over time or during shipping from the factory. In my case, with my speakers, I learned from an online forum that the recommended torque setting is 0.85 Nm for the 3K super tweeter, tweeter, and upper mid array, but this can vary depending on personal preference. I own a Sealey digital torque wrench and adjusted the torque of my 3K tweeter-midrange array bolts according to the .85 Nm setting with remarkable results.
Your speaker drivers may require different torque settings for optimal performance. I suggest you ask your dealer or the manufacturer, or a hi-fi forum, for the recommended torque settings for your model of speakers. Or, you can experiment on your own and determine what sounds best to you. The results you can achieve from proper torque setting can be astonishing.







Leave a Reply